WSJT-X Configuration Guide
After installing WSJT-X, the user must configure the program with some basic information. There are six different areas, or “tabs,” which are located under the main Configuration menu: General, Radio, Audio, Tx Macros, Reporting and Frequencies. Some of these tabs contain options which are necessary to input or select (i.e. your Call Sign and Grid Square in the General Tab, for instance) for operation of the program. Some are options which must be chosen with a mind towards your station, such as those found in the Radio and Audio tabs. The remaining tabs, Tx Macros, Reporting and Frequencies, though no less important, are mostly ancillary and designed so the user can further customize WSJT-X to better integrate with their station, operating style and reporting needs.
The following chapter has been designed with a picture of a particular tab, along with a list of options available to the user, delineated by section, under that particular tab. Finally, each particular option is accompanied by a brief definition of what the option does (or does not do).
Many, if not most, problems using WSJT-X can be resolved by careful study of the configuration settings. Please review the following in order to maximize your enjoyment of WSJT-X.
General Tab
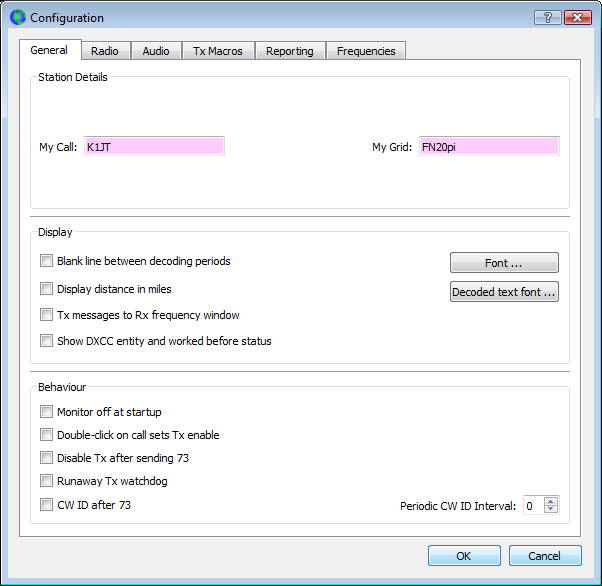
Start WSJT-X and select Configuration from its File menu. Enter
the following information in your Station Details section at the top:
- My Call: <Your Call Sign> This box only accepts calls that are usable in the JT65/JT9 protocol. Compound call signs (such as xxx/K1ABC or K1ABC/x) are handled in a different way.
- My Grid: <Your Maidenhead locator> Enter your Grid Square here. You can enter either a four digit (i.e. FN20) or six digit (i.e. FN20pi) locator. Be aware, however, that not all grid squares are supported; the chances of your grid square being unsupported is unlikely.
In the Display section, you have the following options to either activate or leave disabled:
- Blank line between decoding periods: As configured initially, many find WSJT-X ’s user display easy to read. However, some may find that a blank line inserted between decoding periods helps them delineate between decoding periods. If you feel like you need a little extra space, please select this option.
- Display distance in miles: If this option is selected, WSJT-X will calculate the distance between your grid square and the other station’s.
- Tx messages to Rx frequency window: If selected, this option injects the outgoing transmission message into the Rx Frequency window; this message is highlighted in yellow. This option allows the user to see what message was sent during a TX period.
- Show DXCC entity and worked before status: If enabled, this option annotates the received decodes with information about the entity name and whether or not it has been worked before.
- The Font Button: This menu gives the user the ability to select the font used throughout the main program, except in the decoded text windows, Band Activity and Rx Frequency.
- The Decoded text: This menu gives the user the option to select the monospaced font to be used in the two decoded text windows, Band Activity and Rx Frequency. Only monospaced fonts are supported so as to keep the text properly aligned.
In the Behaviour section, you have the following options to either activate or leave disabled:
- Monitor off at startup: The Monitor button enables full CAT control and enables decoding. If you prefer WSJT-X not to take over your station upon startup (which would be useful if you were already in the middle of a QSO and just warming up the program for later use) then select this option. With this option enabled, WSJT-X tracks the station’s frequency but does not send any commands to the station in order to control the frequency/mode/spilt status, thereby not disrupting a currently ongoing QSO.
- Double-click on call sets Tx enable: The default operating procedure in WSJT-X is to select the Enable Tx button in the user control window to begin a QSO. This default mode prevents undue transmissions. However, many forget this and attempt a QSO by double clicking on a decoded message, which does not activate the radio. By selecting this option, you are able to set WSJT-X to transmit by double clicking on a decoded message.
- Disable Tx after sending 73: In a normal QSO sequence, the operator selects the relevant messages to send. After sending your final message, such as K1ABC G0XYZ 73, it is possible to send this message again because Enable Tx is still activated. If you select this option, once you send your 73 message, WSJT-X will disable its transmit cycle.
- Runaway Tx watchdog: Occasionally, due to operator distraction, the next transmission in the series for making a minimally valid QSO will not be selected by the user. If this happens, you can continue to inadvertently send the same message repeatedly. You can prevent this from happening by selecting this option.
- CW ID after 73: Check to send your call sign in CW after sending 73.
- Periodic CW ID Interval: By selecting this option, WSJT-X will use the input value of your choosing as the interval between times when your station will automatically identify via CW. The default setting is 0, meaning that there will be no CW identification.
Radio Tab
Let us now turn our attention to the Radio Tab, the second Tab under the Configuration menu. This section focuses on CAT control between your radio and WSJT-X.
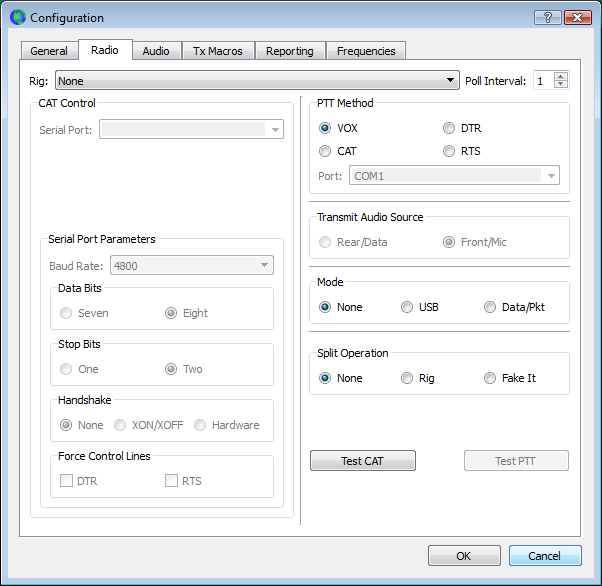
Note: Unless you have selected Monitor off at startup under the General tab, WSJT-X expects to seize exclusive rig control upon startup. You can prevent this by either selecting that option or by selecting the Monitor button on the main window and toggle it. Once done, WSJT-X relinquishes exclusive rig control (but not the control port or client connection itself). As it is extremely convenient to have all your required station programs running, which can include radio control software, it is imperative that the operator understands that any change in a separate radio control program can induce unwanted effects in WSJT-X. If you would like to switch to another operating mode while leaving WSJT-X on in the background, simply toggle the Monitor button so that WSJT-X is no longer active. First, select your radio using the Rig menu. None may be selected if no CAT control is available or desired. Selecting your radio from this menu is the most common method of interfacing your radio with WSJT-X. If this is the manner you choose, you can skip the following information and pick back up below.
This tab behaves differently if network or inter-program communications are selected as opposed to direct CAT control via Hamlib:
If Commander or Ham Radio Deluxe is selected, then the “Network Server” may be left blank in order to access the default instance on the local machine. If these programs are running on a different machine and/or port, that can be specified. Hover over the text to see details about how to change these settings in a tool tip.
- OmniRig Rig 1 or OmniRig Rig 2 may be selected to connect to an OmniRig server on the same machine (this is only available on Windows since it uses a Microsoft proprietary communications protocol).
- Hamlib Net rigctl may be selected to use the Hamlib “rigctld” radio server, like Commander and Ham Radio Deluxe. This has a default “Network Server” which will work on the local machine and so can normally be left blank.
The Poll Interval option has changed in v1.4.
- Poll Interval: Unlike previous versions of WSJT-X, v1.4 CAT control cannot be set to zero as the stricter CAT control of this version requires polling at all times. The number represents the interval in seconds by which the radio is queried from WSJT-X. With most radios you can set Poll Interval to a small number (e.g. 1 – 3 seconds) and the program will follow any frequency changes made at the radio. As noted above, the user will not be able to control the radio from WSJT-X and from another CAT Control program at the same time; so while it is convenient to have all your station software running at once, only one program can be the primary CAT Control software at any particular instance. Some experimentation may be required; refer to your radio’s documentation how to interface your control software and your radio. There are two best practices to consider when using WSJT-X:
- It is best to have the radio and any interface equipment turned on and connected before starting WSJT-X, and to exit the program before turning the equipment off.
- It is best to use only one CAT control interface at a time. If you use Ham Radio Deluxe, then use it alone for its particular utility for the mode you are operating. If you are trying to make WSJT-X QSOs, then use it and it alone. By changing any frequency, band settings or other changes in another CAT control piece of software than WSJT-X itself, you will find your transmissions are probably not on the frequency, band or even mode WSJT-X expects to be in.
In the CAT Control section:
- Select the Serial Port connected to your station’s radio. The Serial Port Parameters are largely standardized: Baud Rate, Data Bits, Stop Bits and Handshake. These settings need to match the radio requirements and can be found in the operating manual for your radio. It is best to select the highest working baud rate available on the rig and to also select the shortest poll interval. This combination will give the smoothest feedback. If the baud rate is set too low, then a longer poll interval may be required to avoid a backlog of CAT serial port traffic. The Handshake option must be set correctly: many Kenwood rigs require hardware handshaking to access the CAT port, for instance. XON/XOFF flow control is available as an option; however, as no current radio requires this particular form of communication, it is most likely not the right option for your station, but is included in case your radio requires this option. Lastly, in the Force Control Settings, the RTS & DTR check boxes select which serial control line is raised high, or in other words, left on. Whether you will need this particular setting depends upon the interface hardware configuration of your station. These boxes should only be checked if you are certain that the interface hardware configuration of your station requires a constant voltage on one of these serial lines for operating power.
In the PTT Method section, like CAT Control, has an editable box that allows a user defined non-standard port name. It is only available when a non-CAT/non-VOX PTT setting is selected. This box only appears for non-network rig control options. It is editable so there is no longer any need to hack the .INI file to support non-standard serial port device names. The last edited value is saved between sessions.
- PTT Method: choose from RTS, DTR, CAT, or VOX. VOX is the simplest to set up, as it uses the presence of synthesized audio from the sound card to key the radio. This can be used when no serial port or CAT capability is available. Obviously, the rig needs to be in VOX mode (however, some interfaces have a facility to generate a PTT signal when audio is being input to the radio) for this to work.
- Select a Serial Port: The PTT serial port may be the same one as the CAT serial port or any other serial port on the system.
In the Transmit Audio Source section, you have the option to choose between Rear/Data or Front/Mic. Some radios support of two types of PTT assertion via CAT control (and some support both): one takes audio input from the Mic connector, while the other takes audio input from a rear-panel Data connector. Read your radio and audio-interface (if used) manuals and then choose the appropriate selection in this box.
A brand new feature in WSJT-X v1.4 has been introduced as the Mode setting. It is a convenience feature to ensure the radio is in the right mode for WSJT-X operation.
- None: Clicking this option tells WSJT-X not to try and set the radio mode; it is up to the operator to select the correct radio mode before commencing operations. See your radio’s user manual to determine the proper setting and setup for your station.
- USB: A some rigs do not have a DATA mode, this option will attempt to set the radio to USB.
- Data/Pkt: Some rigs must be switched to DATA mode to select the rear audio line input, which may be the ideal way for you to set up your station.
The Split Operation section contains the following three options:
- None: I have yet to come across a rig that can span the full 4kHz audio bandwidth required on transmit for dual JT65+JT9 mode. Regardless of that if such a rig did exist I would still recommend using a normal SSB TX bandwidth of ~2.5kHz and turn on split mode (either via rig CAT or emulated). This is because split mode ensures that TX audio is always generated between 1.5kHz and 2kHz with the transmit frequency adjusted to place the signal in the radio spectrum as indicated by the red waterfall cursor.
- Rig: WSJT-X will set the rig split mode as required with this option. This is essential for dual JT65+JT9 mode to be used but is also useful in single mode operation.
- Fake It: This option can be used on rigs that don’t support split control via CAT commands. WSJT-X will adjust the rig frequency just before and after switching from RX to TX and vice versa, as this technique results in a pseudo split emulation mode. Rig split operation is preferred if it is supported since it guarantees glitch free switching between RX and TX.
Lastly, in the bottom right hand corner of the Radio tab, there are two buttons. Their function is as follows:
- Test CAT: This toggle button will turn green if communications via CAT between the radio and WSJT-X are established. It will turn red and an error message box will occur if there is a problem. This error is generic and will also pop up if a CAT error or anomaly occurs in normal operation. This error message will show further details of the error and allows the user to retry the CAT command or go to the configuration dialog to adjust configuration settings. CAT errors that are not retried are fatal; unlike v1.3, where split operation was disabled and the user could continue, but the rig could be left in a state that lead to incorrect operation.
- Test PTT: This toggle button functions like the Test CAT button above, except it toggles the PTT circuit between RX and TX, which helps the operator determine if the PTT circuit is in good working order and configured appropriately.
Audio Tab
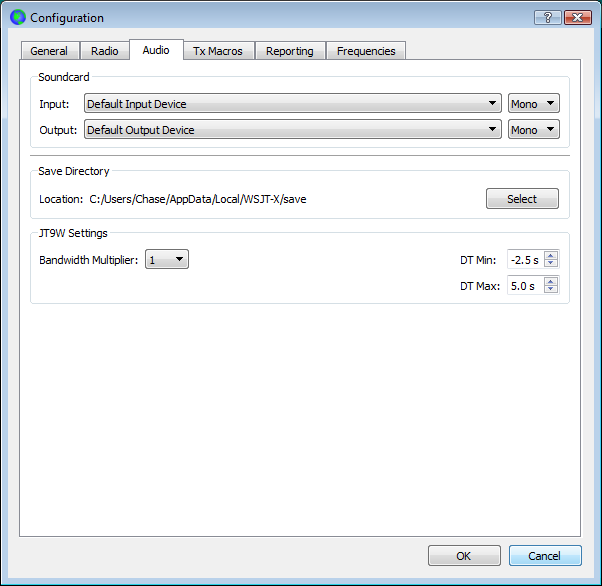
- Soundcard: Select the devices you will use for Audio Input and Audio Output, along with the proper audio channel, which for most cases, is Mono, instead of Left or Right. However, some audio setups may require such a configuration, and it is left to the user to determine the appropriate selection.
- Save Directory: If you have elected to save your received periods for further study, this is the directory in which they will be located. The files will be saved as uncompressed .WAV files. You will need to enable this option from the Main Window Menu.
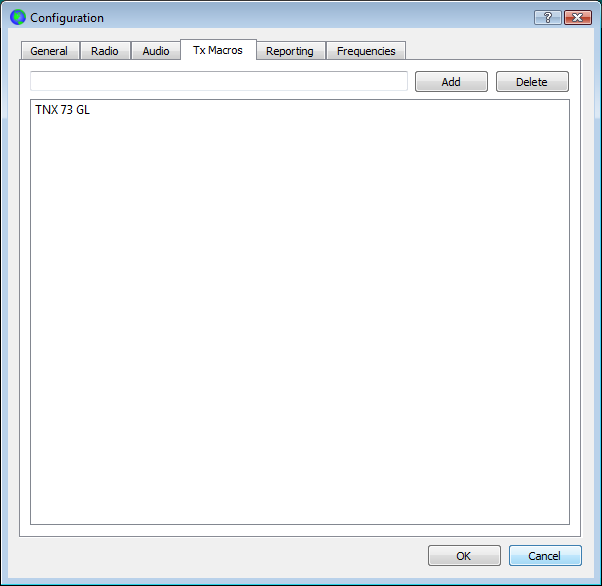
Tx Macros Tab
Tx Macros are an aid designed for sending free-text messages instead of those automatically generated for you in the Main Window. While understanding that JT65 and JT9 are not conversational modes, you can substitute any number of messages as you see fit that communicate further information than what is required for a minimally valid QSO. This menu has the following features:
- To add your custom message(s), simply enter your message in the text box at the top of the tab and click Add to incorporate your new message to the entry fields provided; similarly, if you no longer wish to use a particular macro, simply select the message from the list and click Delete. Some suggestions you may wish to include could be messages such as: “FB SIG 73 GL”, “BIG SIG 73 GL”, “RR THX 73 GL” and so on.
- Multiple macros can be deleted by right clicking to get the pop-up delete menu item. Can delete a single macro or multiple, as you prefer.
- The order of macros (as displayed in this tab and in the Main Window) can be changed by dragging and dropping the macros in the configuration dialog list. You can either drag and drop one at a time, or you can choose an extended selection that can also be dragged and dropped.
You can access your macros from the Main Window screen by clicking on the “2” Tab in the Generated Message Box area, selecting Free Msg and then using the drop down menu to select the message you’d like to send.
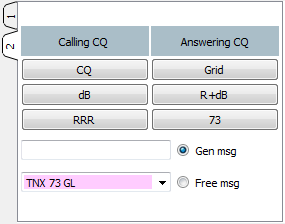
New TX macros can also be inserted into the list by simply pressing the ENTER key after typing a new one into either of the Main Window free text box line edits (i.e. Gen msg or Free msg).
In either JT65 or JT9, the maximum free-text message length is 13 characters, including spaces. Please be aware of this limitation as you craft your messages.
Reporting Tab
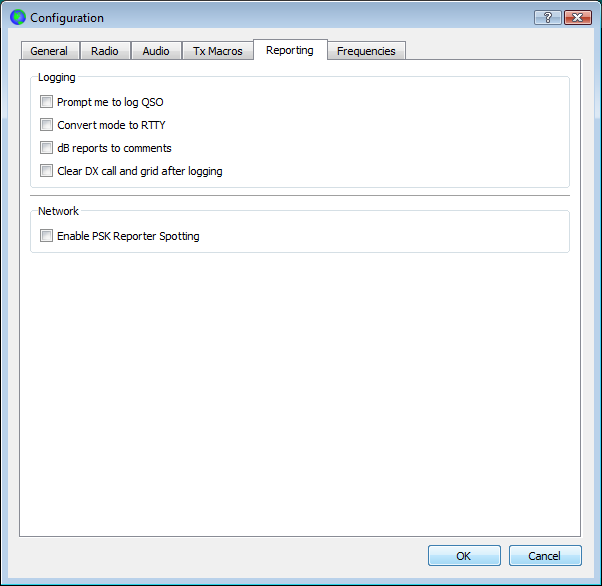
In the Logging section, there are four options regarding keeping a log of your contacts:
- Prompt me to log QSO: With this option enabled, when sending either the “73” message or a free text message, the log book opens a dialogue window and reminds the user to log the QSO. If this option is left unchecked, WSJT-X will not prompt you to log the contact.
- Convert mode to RTTY: Some logging programs do not recognize WSJT-X modes as listed in the WSJT-X produced log, i.e., JT65 or JT9. In that case, you can convert the mode in the log to RTTY in order to get credit for your digital contact.
- dB reports to comments: Some logging programs are inflexible in accepting non RST style signal reports. If you have such a program, select this option to place a comment field in the WSJT-X log; this will keep the signal reports you exchange during a contact by placing them in the Comments field. When you import your WSJT-X log to your logging program, you will then have your signal reports intact and ready for QSLing.
- Clear DX call and grid after logging: After logging a contact, this option clears the previous QSO partners callsign from generated messages.
In the Network box, there is the following option:
- Enable PSK Reporter Spotting: Check to enable sending reception reports to the
PSK Reporter mapping facility.
Frequencies Tab
The Frequencies tab allows you to define the default frequency, offset and a brief description of your antenna for each amateur band. The antenna information will be included with reception reports to
PSK Reporter, if enabled in the Reporting Tab.
When WSJT-X is freshly installed, the Working Frequencies table comes pre-populated with the currently agreed upon HF working frequencies for JT65. The user can tailor this list, the results of which will be reflected on the Main Window screen, by either removing frequencies that they don’t intend to use or adding any other frequencies that they do wish to have. More than one frequency on a band is allowed.
The rows in the table may be sorted in ascending or descending order of frequency by clicking the appropriate column heading. The table supports extended selections for multiple deletions and dragging rows.
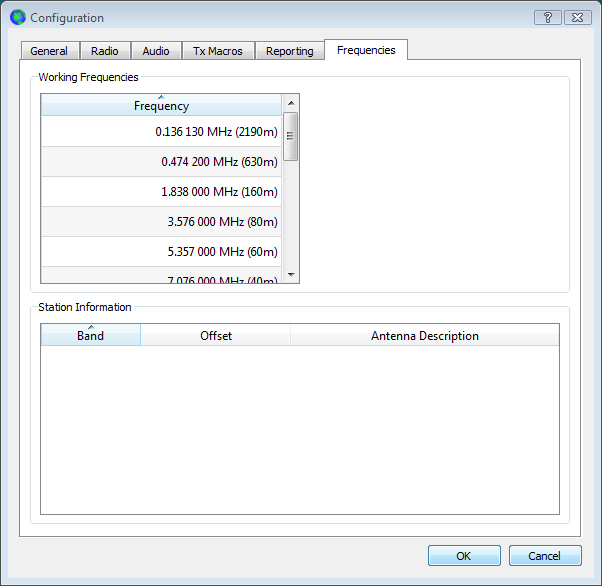
- In the Working Frequencies section, you can add a frequency to the list by right-clicking in the Frequency box and selecting “Insert;” if you’d like to delete a frequency, you use the same process, except select “Delete” instead. In the dialogue box, simply input the frequency you desire. Note: WSJT-X recognizes amateur band plans and any frequencies not within them will output “OOB” for “Out Of Band,” in the description next to the frequency. This entire table may also be dragged and dropped onto the Station Information table below to initialize that table for entry of antenna descriptions and transverter offsets, if required.
- In order to edit your Station Information, again, simply right-click in the Station Information box and select “Insert.” You can add Band, Offset and Antenna Description information as desired. You will note that it is easier to simply drag one of the options from the Working Frequencies section and edit it to your requirements. While the Band and Antenna Description functions are evident by their names, the Offset function is not as clear. Its purpose is for correct frequency readout and frequency setting when the station setup involves a transverter. The offset is applied to the frequency just before a frequency setting CAT command and in the reverse direction when interpreting a CAT frequency status query from the rig. The Offset allows the user wide latitude when experimenting with VHF/UHF/Microwave bands, and also takes into account the new VLF bands that are usually reached with a transverter, as well.
Some further notes on manipulating the Station Information table:
- The table may be sorted by any of its columns by clicking the column heading, either in ascending or descending order. The table also supports extended selections for deletions via the right click pop up menu “Delete” menu action.
- The Antenna Description may be dragged and dropped from one band to another which simplifies set up when multiple bands share an antenna.
Once you have configured all the settings to your liking, click OK to dismiss the Configuration window. You are now setup to operate and make WSJT-X contacts!