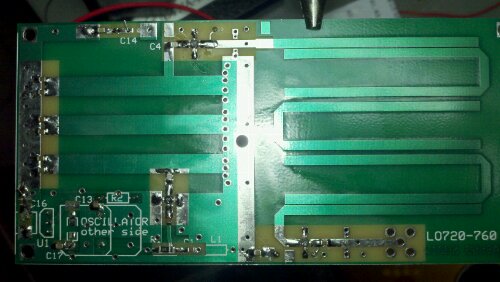
My 33cm W1GHZ transverter is assembled! However, it isn’t a fully functional transverter because I do not yet have a complete sequencing system in place. That said, the transverter and LO boards are assembled and plumbed. I am continually on the hunt for the right kind of enclosure to use for the entire bit of kit and hope to have something soon.
Recently, with the kind help of Charles, K4CSO, I was able to have the device tested and get its measurements checked. I don’t have the ability to check anything as I have no test equipment, and so I am very thankful for Charles to take time out of his day to lend a hand and expertise. I was surprised by the results- mainly that they worked at all! I don’t have a great deal of experience with surface mount soldering and often was concerned that I had cooked some part or other. Turns out everything works fine!
Considering the cost of these kits, one is getting a new band for not a lot of money. I secured the transverter boards and parts for $48. With connectors, switch, sequencer, power parts and eventually some sort of enclosure, I imagine the entire project will cost me $100. The same sort of thing (recognizing that there are significant differences between the two and that I’d rather have the DEMI if I could afford it) from DEMI would cost over $200 for the kit, and closer to $300. The next comparable 902/3 transverter kit is from W7BAS and is currently $199 plus $6 for shipping. So, like I said, you are getting on a new band for not a lot of money- but how well does it work?

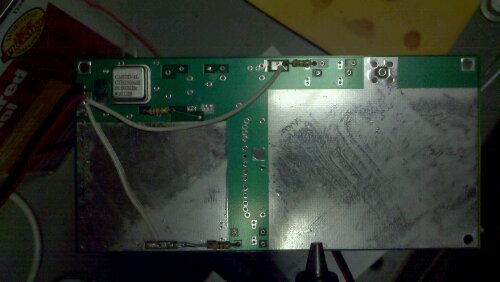
I put the LO board together first. I decided that the best way to approach this would be to solder all the capacitors and resistors in place and then move on to the more delicate MMICs, crystal oscillator and voltage regulator. This worked very well; if I had it to do again (and I will for my 1296 board), the only difference would be that I would solder the PCB to SMA (coax connector) first. It appeared to take a lot of heat to get the connector warmed up and as a result it transfered a lot of heat to the board. If you put this connector on first, you won’t run the risk of cooking the nearby MMIC. And speaking of MMICs, I used the MAR-6 and MAR-1 from Minicircuits as was listed in the parts sheet by Paul Wade.

After applying some power (the +12 → +8 volt power plant was built using an LM7808 bolted to the ground plane), the current limiter said that the board drew 82 milliamperes. Not a lot of current! The LO output was +6.68 dBm, right where it should be for the +7dBm mixer on the transverter board (which had to be jumpered to reach the LO; I used a small piece of brass stock you can get from most hardware stores to jump the trace). What was odd, however, was the frequency itself was not as close as I would have liked- the LO’s output is 755.985 MHz, off by 15 kHz from the goal of 756 MHz. Doing a mild heat test of the crystal revealed that with an increase in temperature (unmeasured; used a heat gun), the crystal drifted another 10 kHz and landed at 755.975 MHz. A better crystal oscillator would be closer to the desired frequency, as the Cardinal one that was supplied had a stability rating of +/- 100 ppm- they make them down to +/- 5 ppm in this particular form factor. Eventually, even the hobbyist will have some sort of synthesizer to do the heavy frequency (timing) lifting that was once the domain of the crystal oscillator (you should really check out Andy’s, G4JNT, website for some synthesizer projects).
The transverter board itself was fairly easy to put together. I would warn other folks to mind where you are putting the power supply capacitors for the T/R circuits, as you will want to drape some off the edge, so to speak, and make sure that the wire you want to use is in the right place and soldered down before you put in all the caps. Alternatively, you may want to place them on the bottom of the board. Here again, it is better to think of the major parts (plumbing and power) that have to fit somewhere first and then worry about where the little stuff is going to go.

I was pleased that the transverter put out +15.25 dBm (or, approximately 32 mW). The TX side of the circuit took 187 milliamperes and the RX side of the circuit 120 milliamperes. The 1 dB compression point (or more formally, P1dB) was at -2 dBm. So, at least for my transverter, I need to attenuate my radio to -2 dBm output drive in order to avoid saturating the circuit. Here, I used the following MMICs: A1=SGA3586Z, A2=MAR-6SM and A3=ERA-5SM.

The weak spot in this transverter board design, other than no consideration for built in power on any board that uses +12V input like most do, are the filters. PCB filters aren’t nearly as tight as something one might otherwise procure from Mouser, but certainly will be at a higher cost than using the hairpin PCB filter. Here again, we are confronted with price versus performance. For what I am trying to do, I’ll be able to get by- but for those who like to hack around and make something more than what is given, I believe there are 900 MHz bandpass filters to be had that could tighten up the transverter without doing too much looking.
At the end of things, I’m pleased with the boards. If you want to try to add a band cheaply, but not expect perfection from your price, I think you have found the right kind of kit. I can only think of two improvements I would like to make: (1) at some point I’m definitely going to insulate the crystal with some Styrofoam and (2) may even build some shielding over the PCB hairpin filters. With these two ends tied up, I should have a fairly decent way by which to get on 33cm!